Your Back Is Trying to Tell You Something
Core stability exercises are movements that train the deep muscles around your spine, hips, and pelvis to hold your body steady during everyday activity. Here are the most effective ones, ranked by difficulty:
- Dead Bug – Lie on your back, extend opposite arm and leg, keep lower back flat
- Bird Dog – On hands and knees, extend opposite arm and leg, hold briefly
- Supine Heel Taps – Lie on back, knees at 90°, slowly lower alternating heels to floor
- Forearm Plank – Hold a straight body line on forearms and toes
- Side Plank – Support your body on one forearm, stack your feet
- Glute Bridge – Lift hips off the floor, squeeze glutes, hold
- Stability Ball Knee Tuck – From a push-up position on a ball, pull knees toward chest
Your lower back aches after a long day. Your shoulders round forward at your desk. You feel wobbly doing simple things like picking something up off the floor. Sound familiar?
These aren’t just posture problems. They’re often signs of a weak core.
Most people think “core” means abs. But your core is the entire system of muscles surrounding your spine and pelvis — front, back, and sides. When those muscles don’t work together properly, everything suffers: your posture, your balance, and especially your back.
Low back pain is the second most common reason people visit a doctor, behind only upper respiratory infections. It accounts for one-third of all workers’ compensation costs. And once you have an episode, there’s a 25–60% chance it comes back within a year.
The good news? Exercise — specifically targeted core stability work — is a first-choice treatment recommended by clinical guidelines for chronic low back pain.
This guide gives you a clear, practical list of exercises to fix that, no matter your fitness level.
I’m Pleasant Lewis, owner and operator of Fitness CF, with over 40 years in the fitness industry helping people build stronger, healthier bodies through evidence-based core stability exercises and functional movement. In this guide, I’ll walk you through everything you need to build a core that actually works for you in real life.

Core Anatomy and the Progression of Stability
To understand why core stability exercises are so transformative, we have to look past the surface-level “six-pack” muscles. Your core is actually a complex, three-dimensional box.
The top of the box is your diaphragm (the primary muscle of breathing), and the bottom is your pelvic floor. The sides, front, and back are formed by a layered corset of muscles known collectively as the lumbo-pelvic-hip complex (LPHC).
Inside this box, we have two distinct muscle systems:
- The Inner Core (Local Stabilizers): These are deep muscles that attach directly to the spine. The transversus abdominis (your body’s natural corset), the multifidus (tiny muscles that run along your vertebrae), the pelvic floor, and the diaphragm. Their primary job is to create intervertebral stability. They anticipate movement, firing milliseconds before you lift an arm or leg to keep your spine safe.
- The Outer Core (Global Movers): These are the larger, superficial muscles like the rectus abdominis (the six-pack muscle), the external obliques, the erector spinae, and the hip complexes. These muscles are built to produce movement, transfer force, and control rotation.
If your deep inner core isn’t firing correctly, your outer core has to work double-time to keep you upright. This compensation leads to stiffness, fatigue, and eventually, pain.
By prioritizing Exercises to improve your core strength – Mayo Clinic, you train these systems to work in harmony. This is the cornerstone of More info about functional fitness — building a body that moves efficiently and pain-free in the real world.
To build a truly resilient body, we use a progressive training model. Core training should follow a logical path: starting with holding the spine perfectly still (stabilization), moving to controlled spinal movement (strength), and finally, transferring force dynamically (power).
| Core Training Phase | Primary Objective | Key Muscle Action | Example Exercise |
|---|---|---|---|
| Phase 1: Stabilization | Protect the spine; resist unwanted movement. | Isometric contraction (no spinal movement). | Dead Bug, Forearm Plank, Bird Dog |
| Phase 2: Strength | Build tissue tolerance and control through a full range of motion. | Concentric and eccentric control of the spine. | Cable Rotations, Back Extensions |
| Phase 3: Power | Increase the rate of force production for athletic movements. | Explosive, high-velocity force transfer. | Medicine Ball Slams, Rotational Throws |
Why Core Stability Exercises Prevent Injury and Improve Posture
When you sit at a desk in Orlando or drive through Central Florida traffic, gravity is constantly pulling your body out of alignment. Without adequate core stability, your pelvis tilts forward, your lower back arches excessively, and your shoulders round into the classic “slouch.”
This poor posture does more than just look tired; it alters your joint mechanics.
According to research published in The Journal of Strength & Conditioning Research, individuals with chronic nonspecific low back pain often display altered muscle activation patterns. Their deep stabilizers, like the multifidus, delay firing, which forces larger global muscles to overcompensate. This creates a vicious cycle of muscle spasm, joint stress, and recurrent pain.
By performing regular core stability exercises, you retrain the brain to activate the deep stabilizers first. This keeps your pelvis in a neutral position, supports your lumbar spine, and improves your overall balance and daily function. Whether you are carrying groceries, hiking around Mount Dora, or playing with your kids in St. Cloud, a stable core acts as the anchor that allows your limbs to move freely and powerfully without overloading your back.
Transitioning from Stabilization to Core Strength Exercises
Before you try to lift heavy weights or perform explosive movements, you must master the basics of spinal control. This begins with learning the difference between two foundational core techniques: the drawing-in maneuver and abdominal bracing.
- The Drawing-In Maneuver: This focuses on isolating the deep transversus abdominis. To do this, pull your navel gently toward your spine (imagine trying to zip up a tight pair of pants). It is highly effective for local, deep-layer activation.
- Abdominal Bracing: This is a co-contraction of the entire core “box.” Imagine you are about to get punched in the stomach. You tighten your abs, sides, and back all at once. This creates 360 degrees of stiffness around the spine and is your primary defense when lifting heavy objects.
A logical progression timeline starts with 4 to 6 weeks of dedicated stabilization training. Once you can hold a perfect plank for 60 seconds and perform dead bugs with absolute control, you can begin introducing dynamic movements.
To help you transition smoothly, we have put together a breakdown of the 6 Best Core Exercises for Abs to bridge the gap between static stability and functional strength.
The Best Evidence-Based Core Stability Exercises for All Levels
Now that you know how your core operates, let’s look at the actual movements. Below is a curated list of evidence-based core stability exercises designed to take you from a complete beginner to an advanced athlete.
Speed is the enemy of stability. Every exercise here should be done with slow, mindful control.

When starting out, focus on quality over quantity. If your form breaks down, the set is over. To see how these movements fit into a complete, balanced routine, check out this functional Core Workout for Strength and Stability (20 Minutes).
Beginner Core Stability Exercises: Dead Bug and Bird Dog
For beginners, or those recovering from an episode of back pain, we want exercises that load the core muscles without compressing the spine. The dead bug and the bird dog are the gold standards for this.
1. The Standard Dead Bug
The dead bug is highly effective because the floor provides immediate physical feedback. If your lower back arches, you instantly know your core has stopped working.
- How to do it: Lie on your back with your arms pointing straight at the ceiling and your knees bent at 90 degrees (shins parallel to the floor). Press your lower back firmly into the floor so there is zero gap. Slowly lower your right arm behind your head while simultaneously extending your left leg straight out, hovering just above the floor. Return to the starting position and repeat on the opposite side.
- The Secret: If this feels too difficult, you can read How to Do Partial Deadbugs: Form, Mistakes & Progressions (2026) — FitCraft to learn how keeping your arms still and only moving your legs can help you build baseline strength.
- Why it works: According to The many benefits of the “dead bug” – Harvard Health, this exercise targets all four major abdominal groups while keeping the spine completely supported, making it exceptionally safe and effective.
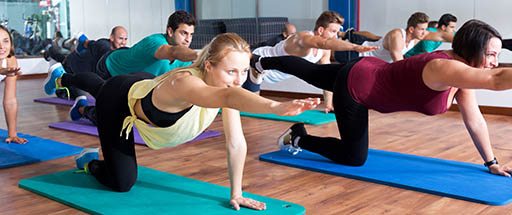
2. The Bird Dog
This exercise trains your core to resist rotation while coordinating the diagonal chains of your body (opposite shoulder to opposite hip).
- How to do it: Start on your hands and knees in a tabletop position, with your hands directly under your shoulders and knees under your hips. Keep your spine neutral. Slowly extend your right arm straight forward and your left leg straight back. Hold for 2 to 3 seconds, focusing on keeping your hips perfectly level with the floor. Return to the start and switch sides.
- Form Tip: Imagine you have a cup of hot coffee balancing on your lower back. Do not let it spill!
3. Supine Heel Taps
- How to do it: Lie on your back in the dead bug starting position. Keeping your knees bent at 90 degrees, slowly lower one foot to tap the heel on the floor, then pull it back up using your lower abdominals. Alternate sides.
Intermediate Progressions: Planks and Side Planks
Once you have built a solid foundation, it is time to increase the challenge by fighting gravity in a face-down position.
1. Forearm Plank with Toe Taps
- How to do it: Get into a forearm plank position with your elbows directly under your shoulders, feet hip-width apart, and your body in a straight line from head to heels. Slowly tap your right foot out to the side, return to center, and then tap your left foot out.
- Why it works: This forces your core to maintain a rigid spine while your base of support changes.
2. Side Plank with Reach-Through

- How to do it: Lie on your side with your elbow directly under your shoulder and your feet stacked (or staggered for more balance). Lift your hips to create a straight line from head to feet. Extend your top arm toward the ceiling. Slowly rotate your torso downward, reaching your top arm underneath your body. Rotate back to the starting position.
- Why it works: This movement targets the obliques and the quadratus lumborum, which are vital for lateral spinal support. For more tips on mastering this, check out our guide on Core Strength Exercises Fitness CF.
Advanced Progressions: Stability Ball Knee Tucks and Copenhagen Planks
These advanced variations introduce unstable surfaces and high lateral demands to push your core stability to its absolute peak.
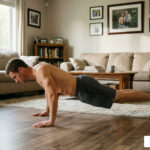
1. Stability Ball Knee Tuck
- How to do it: Start in a push-up position with your shins resting on top of a stability ball. Keep your hands flat on the floor under your shoulders and your core braced. Using your lower abs, pull your knees toward your chest, rolling the ball forward. Pause, then slowly extend your legs back to the starting position.
- Why it works: According to a guide on the Core Exercises: Knee Tuck on Stability Ball – Harvard Health, this movement simultaneously challenges your balance, strengthens your deep abdominals, and builds upper-body stability.
2. Copenhagen Plank
- How to do it: Lie on your side next to a bench or sturdy chair. Place your top foot on top of the bench and your bottom foot underneath it. Support your upper body on your forearm. Lift your hips so your body is in a straight line, supported by your top leg on the bench. For an extra challenge, pull your bottom knee up toward your chest.
- Why it works: This is an incredible exercise for the obliques and the hip adductors (inner thighs), which play a major role in stabilizing the pelvis.
If you are ready to take your core training to the next level without doing a single boring crunch, dive into our guide: Hard Core: The Ultimate Full Body Core Workout for People Who Hate Crunches.
Programming, Common Mistakes, and Safety Guidelines
Building a strong core is a journey that requires consistency, proper form, and patience. Because these muscles are designed to support your spine all day long, they respond best to frequent, high-quality training rather than occasional, exhausting workouts.
However, because the core is so closely linked to your spine, safety must always come first. If you have any pre-existing physical limitations, joint issues, or chronic back pain, it is always a good idea to seek medical clearance before starting a new exercise program.
Common Mistakes in Core Training and How to Correct Them
Even the best core stability exercises can cause problems if they are performed incorrectly. Here are the most common form mistakes we see, and exactly how to fix them.
Mistake 1: Lumbar Arching (The “Banana Back”)
This is most common in planks and dead bugs. When your core tires, your lower back arches toward the floor, shifting the workload from your abdominals to your spinal joints.
- The Fix: Perform a gentle posterior pelvic tilt. Imagine tucked-in tailbone positioning. If you are doing a dead bug, keep your lower back pressed so flat against the floor that someone couldn’t slide a sheet of paper underneath you.
Mistake 2: Holding Your Breath
Many people hold their breath when trying to brace their core. This increases internal pressure and raises your blood pressure, while starving your muscles of oxygen.
- The Fix: Practice diaphragmatic breathing. You should be able to hold a strong abdominal brace while taking deep, controlled breaths. A good cue is to exhale slowly as you extend your limbs during a dead bug or bird dog.
Mistake 3: Moving Too Fast
Using momentum completely defeats the purpose of stability training.
- The Fix: Slow down. Use a tempo of 3 seconds to extend, a 2-second hold at the peak of the movement, and 3 seconds to return to the starting position.
How to Program Your Core Workouts for Maximum Results
To get the most out of your core routine, you should treat these muscles with the same respect as any other muscle group. They need a balance of work, recovery, and progression.
- Frequency: Aim to train your core 3 to 4 times per week. Because these exercises focus on stability rather than muscle failure, they can easily be added to the beginning of your strength workouts or performed on recovery days.
- Sets and Reps: Start with 2 to 3 sets of 8 to 12 slow, controlled repetitions (or a 20 to 45-second hold for static planks).
- Tempo: Keep it slow. Spend 4 to 6 seconds on every single repetition.
- The Big Picture: Core stability is just one piece of a healthy lifestyle. Combining your core work with the benefits of strength training (to build bone density and muscle) and the benefits of cardio (to support heart health) will keep you moving at your best.
If you find it hard to stay consistent on your own, consider working out with a partner. We have written all about The Benefits of Having Workout Buddies to help keep your workouts fun, social, and highly motivating!
Frequently Asked Questions about Core Stability
Can I train my abdominal muscles every day?
While your core muscles are highly resistant to fatigue because they work all day to keep you upright, they still need recovery time to rebuild and get stronger.
If you are performing intense, focused core workouts, it is best to take a day off between sessions to allow for muscle recovery. However, low-intensity movements like basic bird dogs or diaphragmatic breathing can safely be done daily as part of a morning mobility routine.
Are there modifications for back pain or pregnancy?
Absolutely. If you are experiencing acute back pain, exercises that keep you flat on your back (like the dead bug) are often the safest because they protect the spine from bending or twisting.
For pregnancy, particularly in the second and third trimesters, you want to avoid lying flat on your back for long periods. Excellent modifications include standing anti-rotation presses (like the Pallof press) or performing bird dogs on your hands and knees. These help maintain pelvic floor health and support your changing posture without putting pressure on major blood vessels. If you have diastasis recti (abdominal separation), avoid planks and crunches, and focus instead on gentle, controlled breathing and pelvic floor activation.
Will core training give me a six-pack?
Core stability exercises will build deep functional strength, improve your posture, and make you highly resilient to injury — but they won’t automatically give you a visible six-pack.
A visible rectus abdominis is primarily determined by your overall body fat percentage. While strength training helps build the muscle tissue, a healthy diet and active lifestyle are what reveal them. Think of core training as building a strong foundation for your house; it keeps everything stable and safe, even if you can’t see it from the street!
Conclusion
Building a strong, stable core is one of the best investments you can make in your long-term health. By dedicating just a few minutes a day to these evidence-based core stability exercises, you can protect your spine, banish everyday aches, and stand taller with confidence.
At Fitness CF, we are passionate about helping our Central Florida community live vibrant, healthy lifestyles. Whether you are working out at our locations in Orlando, Clermont, Mount Dora, or St. Cloud, our team is always here to support your fitness journey.
If you are currently dealing with discomfort and want to know how to safely stay active, be sure to read our complete guide on How to work out with lower back pain to keep moving forward safely!